Monday, November 24, 2014

2014 has been a very busy year! Whew!


Wow...I can't believe that 2014 is almost over.  I have had a very fun and productive year. Here are pictures of some of the new contributions to my "inventory". 

Of course I have been busy with the bags...

I love to use use interesting contrast fabrics for the backs, straps and the interior of my bags.  And pockets dahling...always pockets (All of my bags below contain interior 1 zippered welt pocket and 2 slip pockets.) All of which can at least can hold a large cellphone. 

A good example of my use of texture is in In Command.
Front - A velvet/beaded applique badge from TOS-Star Trek. Velvet front
and a velvet/canvas woven pattern used on the strap, etc...
Strap is adjustable.

Back with a zippered pocket (Again...who can't use more pockets...right?)


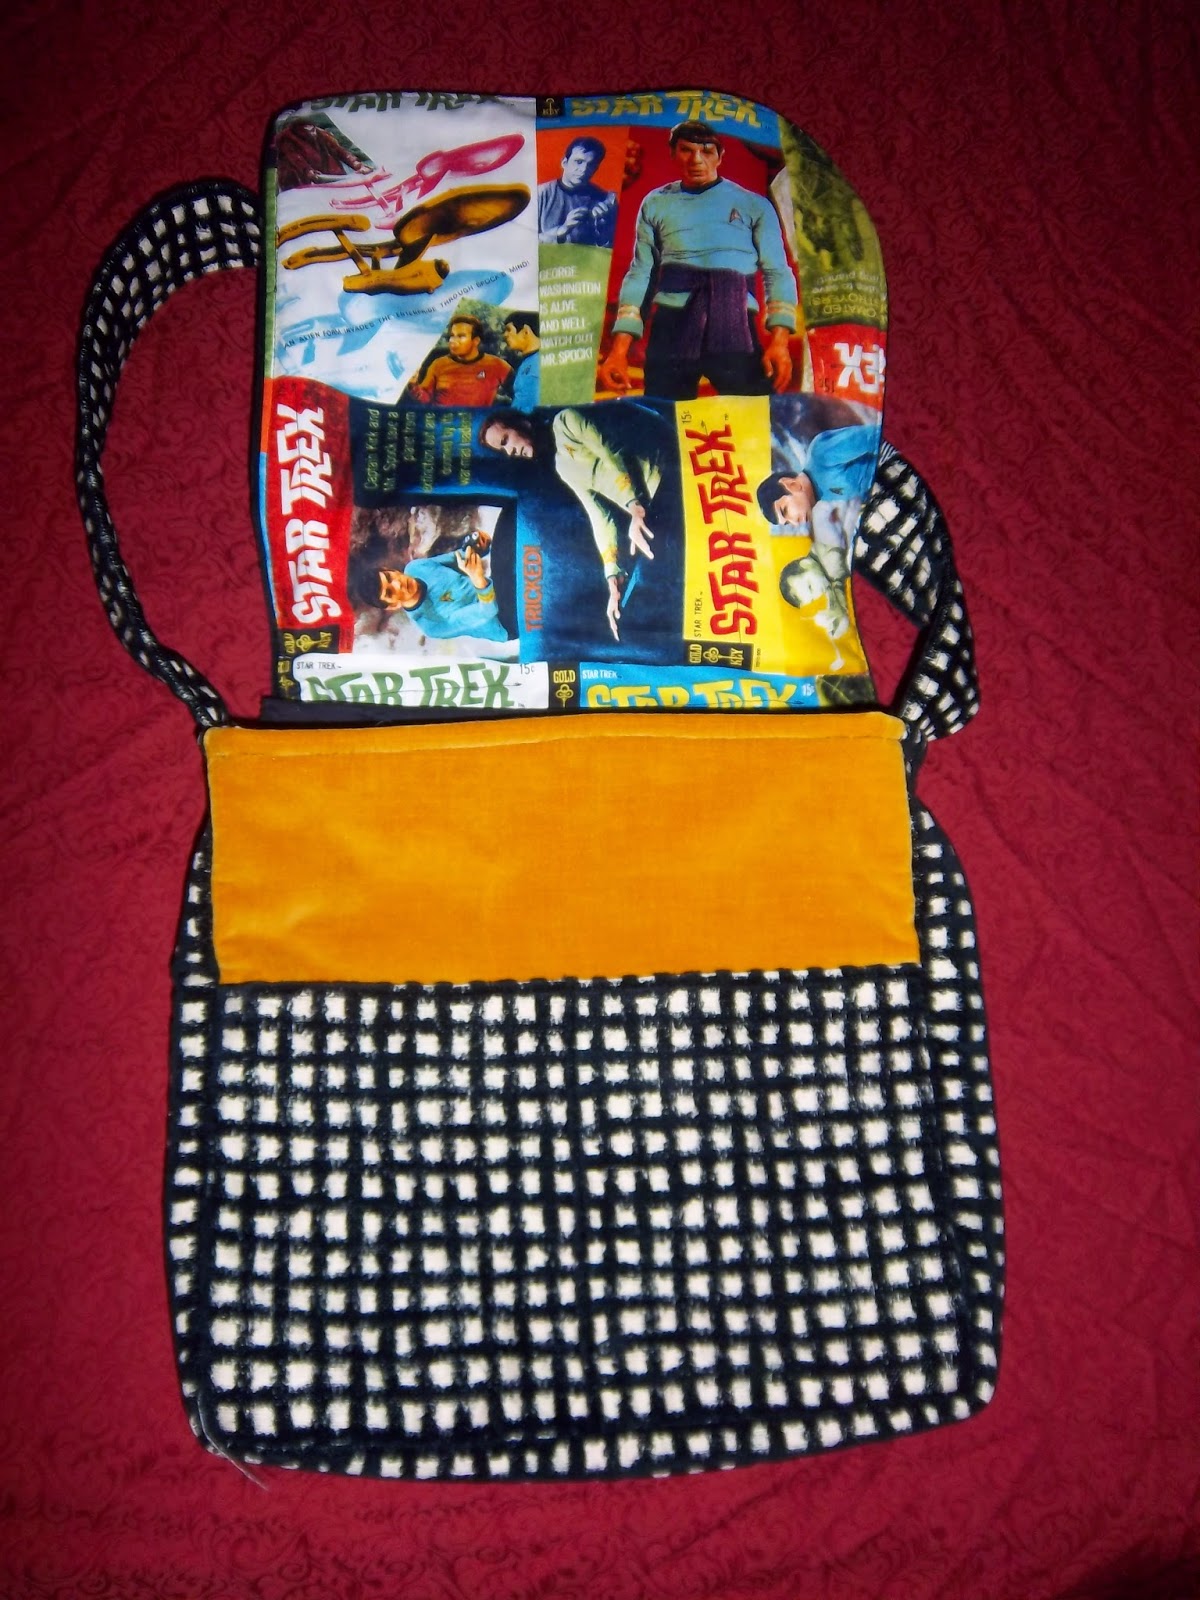
Flap up - showing interior lining plus 2 more pockets?
Below showing a couple of interior shots.


Here are a few other bags....
Summoned - Tote with hand-beaded dragon on a front exterior slip pocket.
Don't Touch That Button! - I have always loved the visual of the Tardis spinning out of control!


Otahime - Dragon Goddess - Vintage Kimono fabric and additional hand beading and quilting.)

On the left,  Dem Bones
On the right, Date of the Dead -
I made this bag for Tamera, who is a fabulous jewelry artist. You can see her work http://www.artfire.com/ext/shop/home/javagoth
Loved it so much I had to make another one.
Both bags use glow-in-the-dark fabric and thread (Who knew!)
and includes a zippered exterior pocket.
Dem Bones bag uses an embroidery design from Urban Threads.
Date of the Dead is my own design and I actually found
glow-in-the-dark beads for that Date night touch....lol.

If you want to see pics of the interiors of my other bags - just send me a note and I can either e-mail them to you or post on my blog. 

In addition to bags, I did do a couple of other textile art pieces...

Hmmmm...Are You Here for Breakfast? I had discussed this quilt on an earlier blog, but here is the finished quilt. 
I just love this piece - I thought his face shows a lot of character.

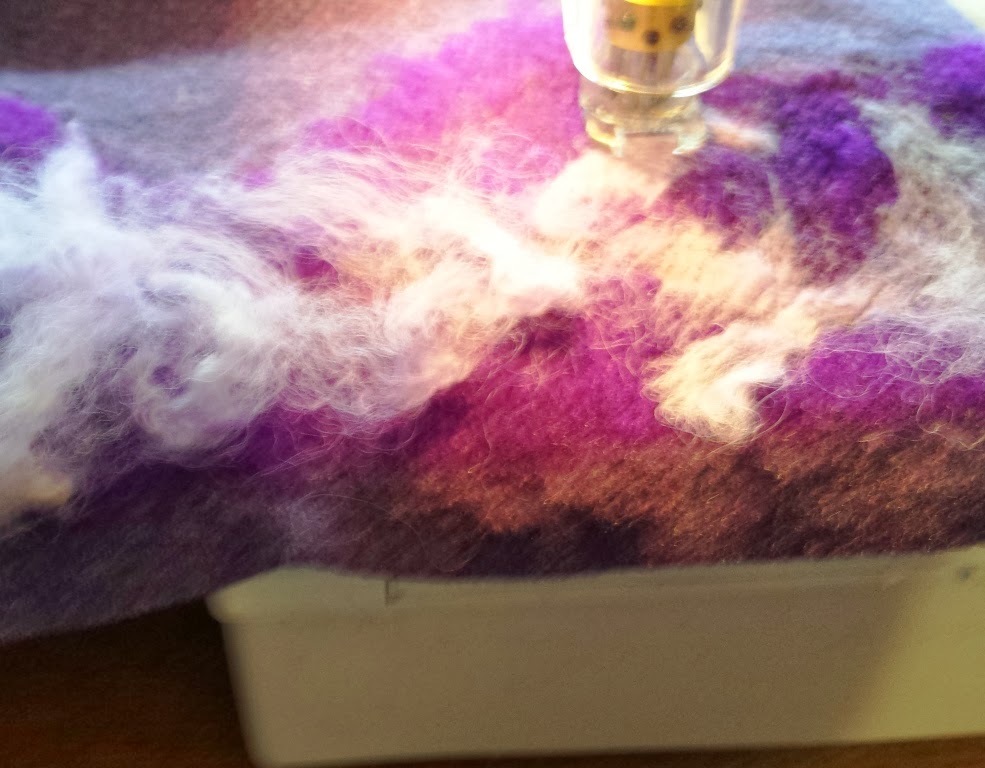
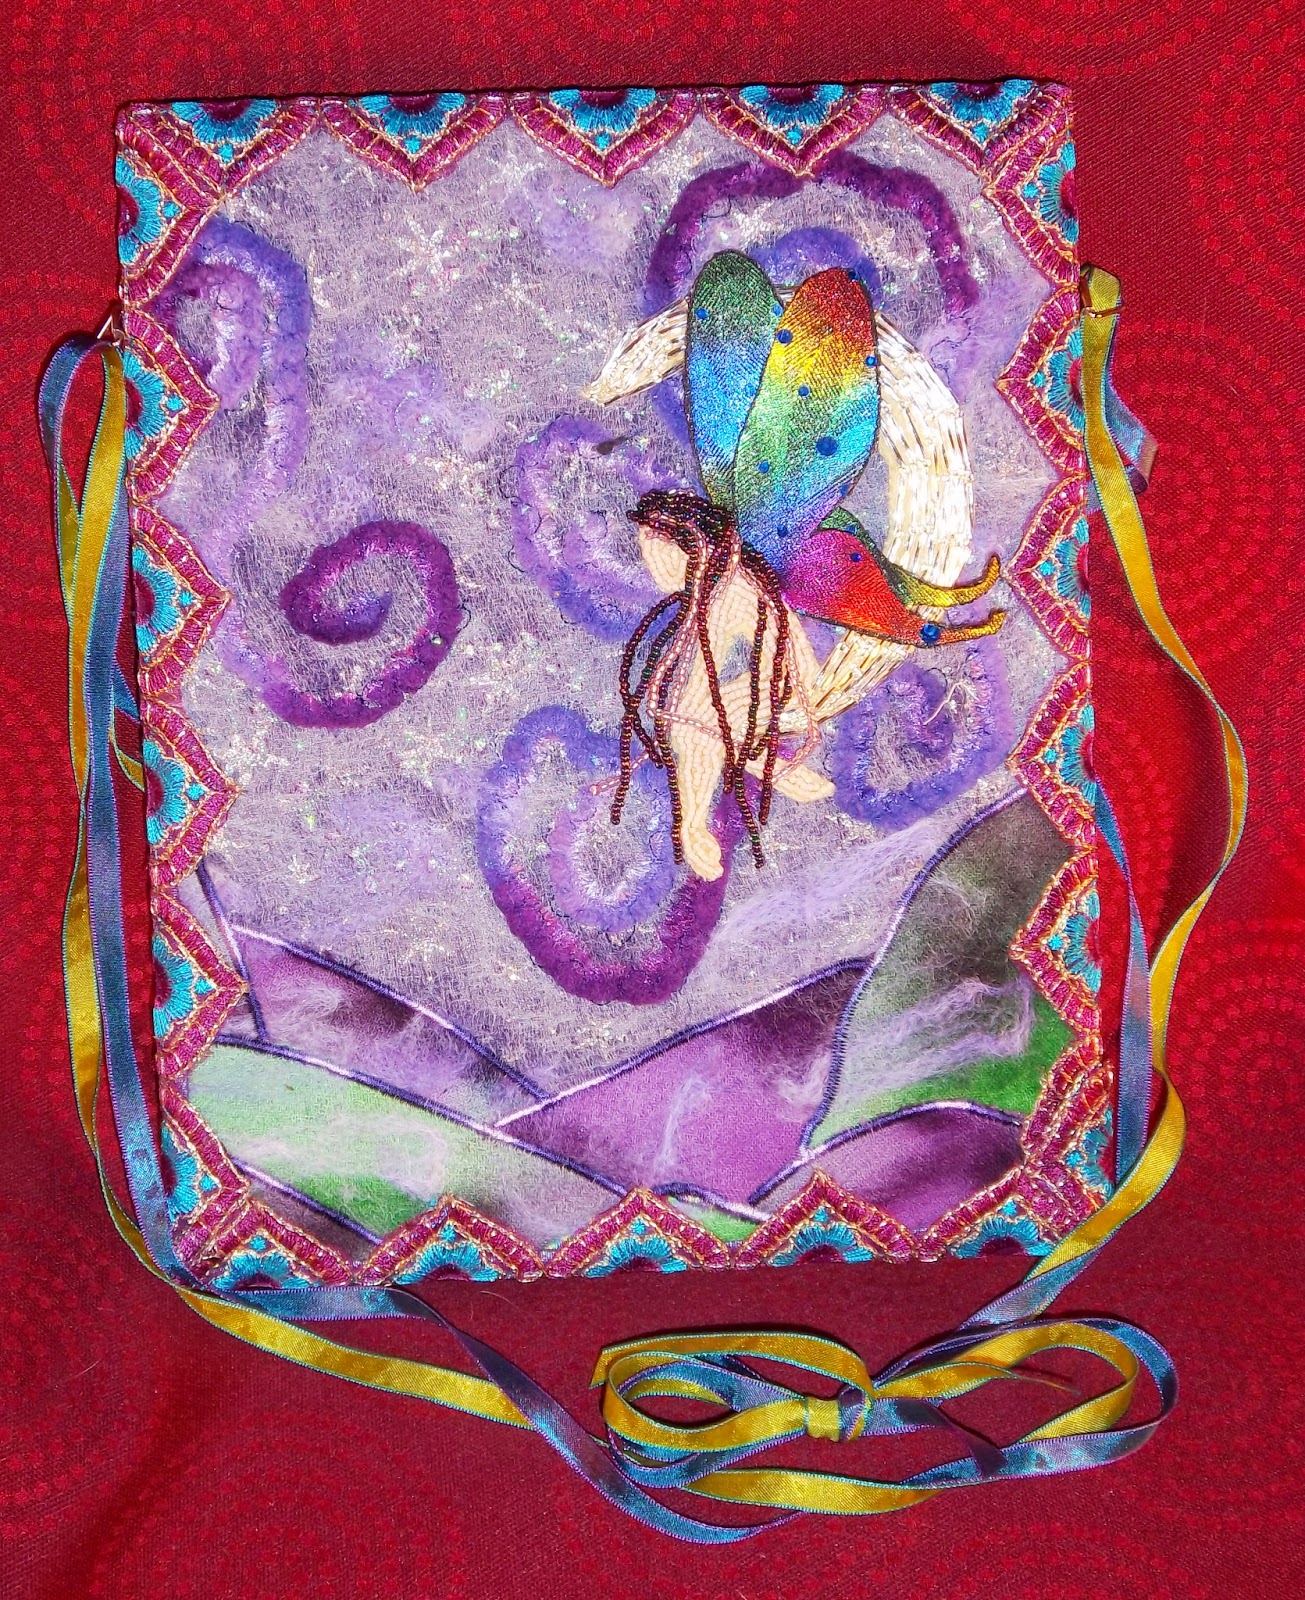
And here is Fae Moon  - This is my first attempt at machine felting. I decided to make this a wall hanging as I don't trust the "hardiness" of this technique in a bag.. I enjoyed doing this so much I look forward to do more with this technique. The possibilities are endless!!

Now it's on to Christmas gifts ;-)

Take care and Happy Holidays! Teri

Monday, June 2, 2014

Queen Manuela - An Epic story about a creation of a Prom Queen's Dress!


My absolutely wonderful and beautiful niece did become Prom Queen!!! Huzzah for Queen Manuela!!!!
It has become tradition that I design and sew the Sr. prom dresses for my nieces. For Manuela, we started this project a year ago. Manuela sent me about 50 or so different images that she liked. (I won't bore you with the details.) What it boiled down to was that she wanted something vintage with modern flair. So after reviewing her images, I started with this sketch:

During the design process, Manuela decided to have the waist dropped to her lower hip-line and she wanted to add a belt. Based on these updates, I proceeded to draft the pattern, cut/sew the muslin. She came up to my house on 2 consecutive weekends for her fittings. Here are some images from the two fittings. During the fittings, Manu decided she did not want sleeves.


I then proceeded to cut the dress out and start to put it together.


We only had one day to do the final fitting. During the fitting we decided to remove the top two layers of the skirt as they were weighing down the netting and crinoline (Yes...we ended up with crinoline under all of this...created from a bridal slip and attached at the seam-line.)

Here she is on Prom Night!


 Plus, the prom had masquerade theme so I made a mask using an embroidery pattern from UrbanThreads.

Here is the happy couple!
This was really a fun project and was happy to co-design this dress with Manuela! And I know she was very happy with it.

And a shout out to my sister Amie who helped with some of the finishing during Manu's final fitting. 

Now onto the next project...Reorganizing my studio and fabric/trim storage!

Love Long and Prosper, Teri


Tuesday, April 22, 2014

UPDATE FROM NORWESCON 37

Well...It was certainly a very exciting weekend at Norwescon 37. 

The Artshow was fantastic. I was able to get feedback from Robert Gould, the Artist Guest of Honor and from Lee Moyer, who was the Artist Guest of Honor last year. Of course Rob Carlos was also very (very) helpful and inspirational. 

On top of that I really got to bond with several of the other artists in the Art Show, including John  Grey III, Lizzie D and Michael Duquette. 

I was truly inspired by the amount of talent that was at the artshow and am honored to have been more involved this year. I am even more motivated and am looking forward to taking my art even further. 

I premiered 5 new pieces and will be posting the photos later this week. As for sales, I did pretty well. I sold 3 bags and 2 of them at the direct sales price. This is very encouraging. As some of you may know, pricing is always tricky. This year I tried a new formula: the Minimum bid reflected the price I was willing to let it go (wholesale) and the direct sales price was my ideal price (retail, or the price that reflects the amount of work I put into it.)

So here are the 3 pieces I sold. It really is like having your children leave the nest (So to speak :-))

A Little bit Sheldon and a Little Bit Penny

PacMan Fever

Back, White and Red Rampant All-Over
 Well it's onto the next project....my Niece's prom dress...Pics to come soon!

Live Long and Prosper! Teri


Monday, March 10, 2014

Dragon Quilt Update

Well...I thought I would post my latest status. Things are moving along on my latest dragon quilt...but I am moving a little bit more slowly than anticipated...Doesn't that does ALWAYS seem to the case? (sigh)

Anyway... 
I have everything cut-out and the quilt base done (Not quilted yet...but ready to be quilted....) Here is the final lay-out...The pink lines by the flowers represent where I am going to out some decorative stitching for the stems. (the spines are done...but not in the layout below...)


Here is the original sketch....
Quilt Details....
I did finish the head....I am quite pleased with how it turned out...

The Chickadees are almost done...I realized they need a little bit more...I want to add "wings" to make the bodies rounder.
And here are the wings...I am really happy...the trick is going to be how it looks when I stitch it down. 


My goal is to finish it by next weekend. I want to premier it at the Norwescon Artshow. http://www.norwescon.org/nwc37/exhibitors/art-show/ And then I will get back to a couple of bags I plan on doing.....plus Manuela's (my niece) Prom Dress. (Which I am very excited about!) 
As always...Live Long and Prosper...Theresa


Thursday, February 13, 2014

Fun with my Embellisher Machine-Part 1

Last year I purchased the Brother Embellisher Machine. This does machine needle felting and expanded my horizons to thread/fabric paint for my artwork and bags.

It did take a bit to get over my fear of using the machine but I finally worked on a project that I hope becomes a bag. I anticipate this Blog will be in 3 parts:

1. Showing the steps I did to machine felt the fabric (See below)
2. Bead embroidering the fabric. 
3. The final result. 

I started with this beautiful purple heather wool....
Base Layer
I experimented on a some of this wool before I moved into the final landscape. Here are some of the effects:
Experiment with Roving.
This was a cool effect, but ended up not using it for this bag.

This was the experiment. I know this picture isn't clear,
but I ended up using 2 of the 4 elements I played with.
This is the final result. You can also machine felt with yarn. That is where the spirals came from. I still have a couple of tweaks, but overall I am pleased. I imagine I will get better once I really learn what the machine can and can't do.....But the possibilities are endless!!!!
Now I just need to
 add my beads and then make the bag!!

Live Long and Prosper! Teri

Thursday, February 6, 2014

Welcome to Dragon Ragz!!!

Okay...I know I have been talking about opening an Esty Shop...While I am not quite ready to open the shop I have updated the name of my business to better reflect what I am doing now. 

So....(Drum roll please)....Welcome to Dragon Ragz. I chose this name not just to reflect my obvious love of dragons, but to give a quick description of what my work stands for. Dragon stands for my point of view...taking an idea and using Color and Texture as an important part of telling the story. The Ragz speaks to my love of using found fabrics,trims and unconventional materials whenever possible.

This new name, I feel, allows me to express my love of art through the fabric medium.. Be it bags, wall art, clothing/costumes or any other idea that suits the idea I want to convey

Please keep an eye out as I continue to post my projects and adventures. I am really excited about the direction I am heading. 

Cheers, Teri